0

Fixed-height elements with an intrinsic ratio

The padding-bottom technique is perfect when you need an HTML element to have an intrinsic ratio, provided the element is 100% wide. But it doesn’t work the other way around, when you want to set the element’s width as a percentage of its height. At least not without a helping hand from JavaScript.

Here is a real world example of when this might be useful, an image carousel where the slides have a fixed height and variable widths:

At different viewport widths the carousel is taller, so we can’t simply hardcode each slide’s width. Before today I would have told you that the only reliable way of scaling the slides was to pass their aspect ratios to JavaScript, calculate the width of each slide relative to its height, then resize them accordingly. And to do that for every slide, every time the viewport is resized. It would be much simpler if the slides could be scaled once by CSS, but to achieve that we need a way to give each slide a relative width.

Continue reading

2

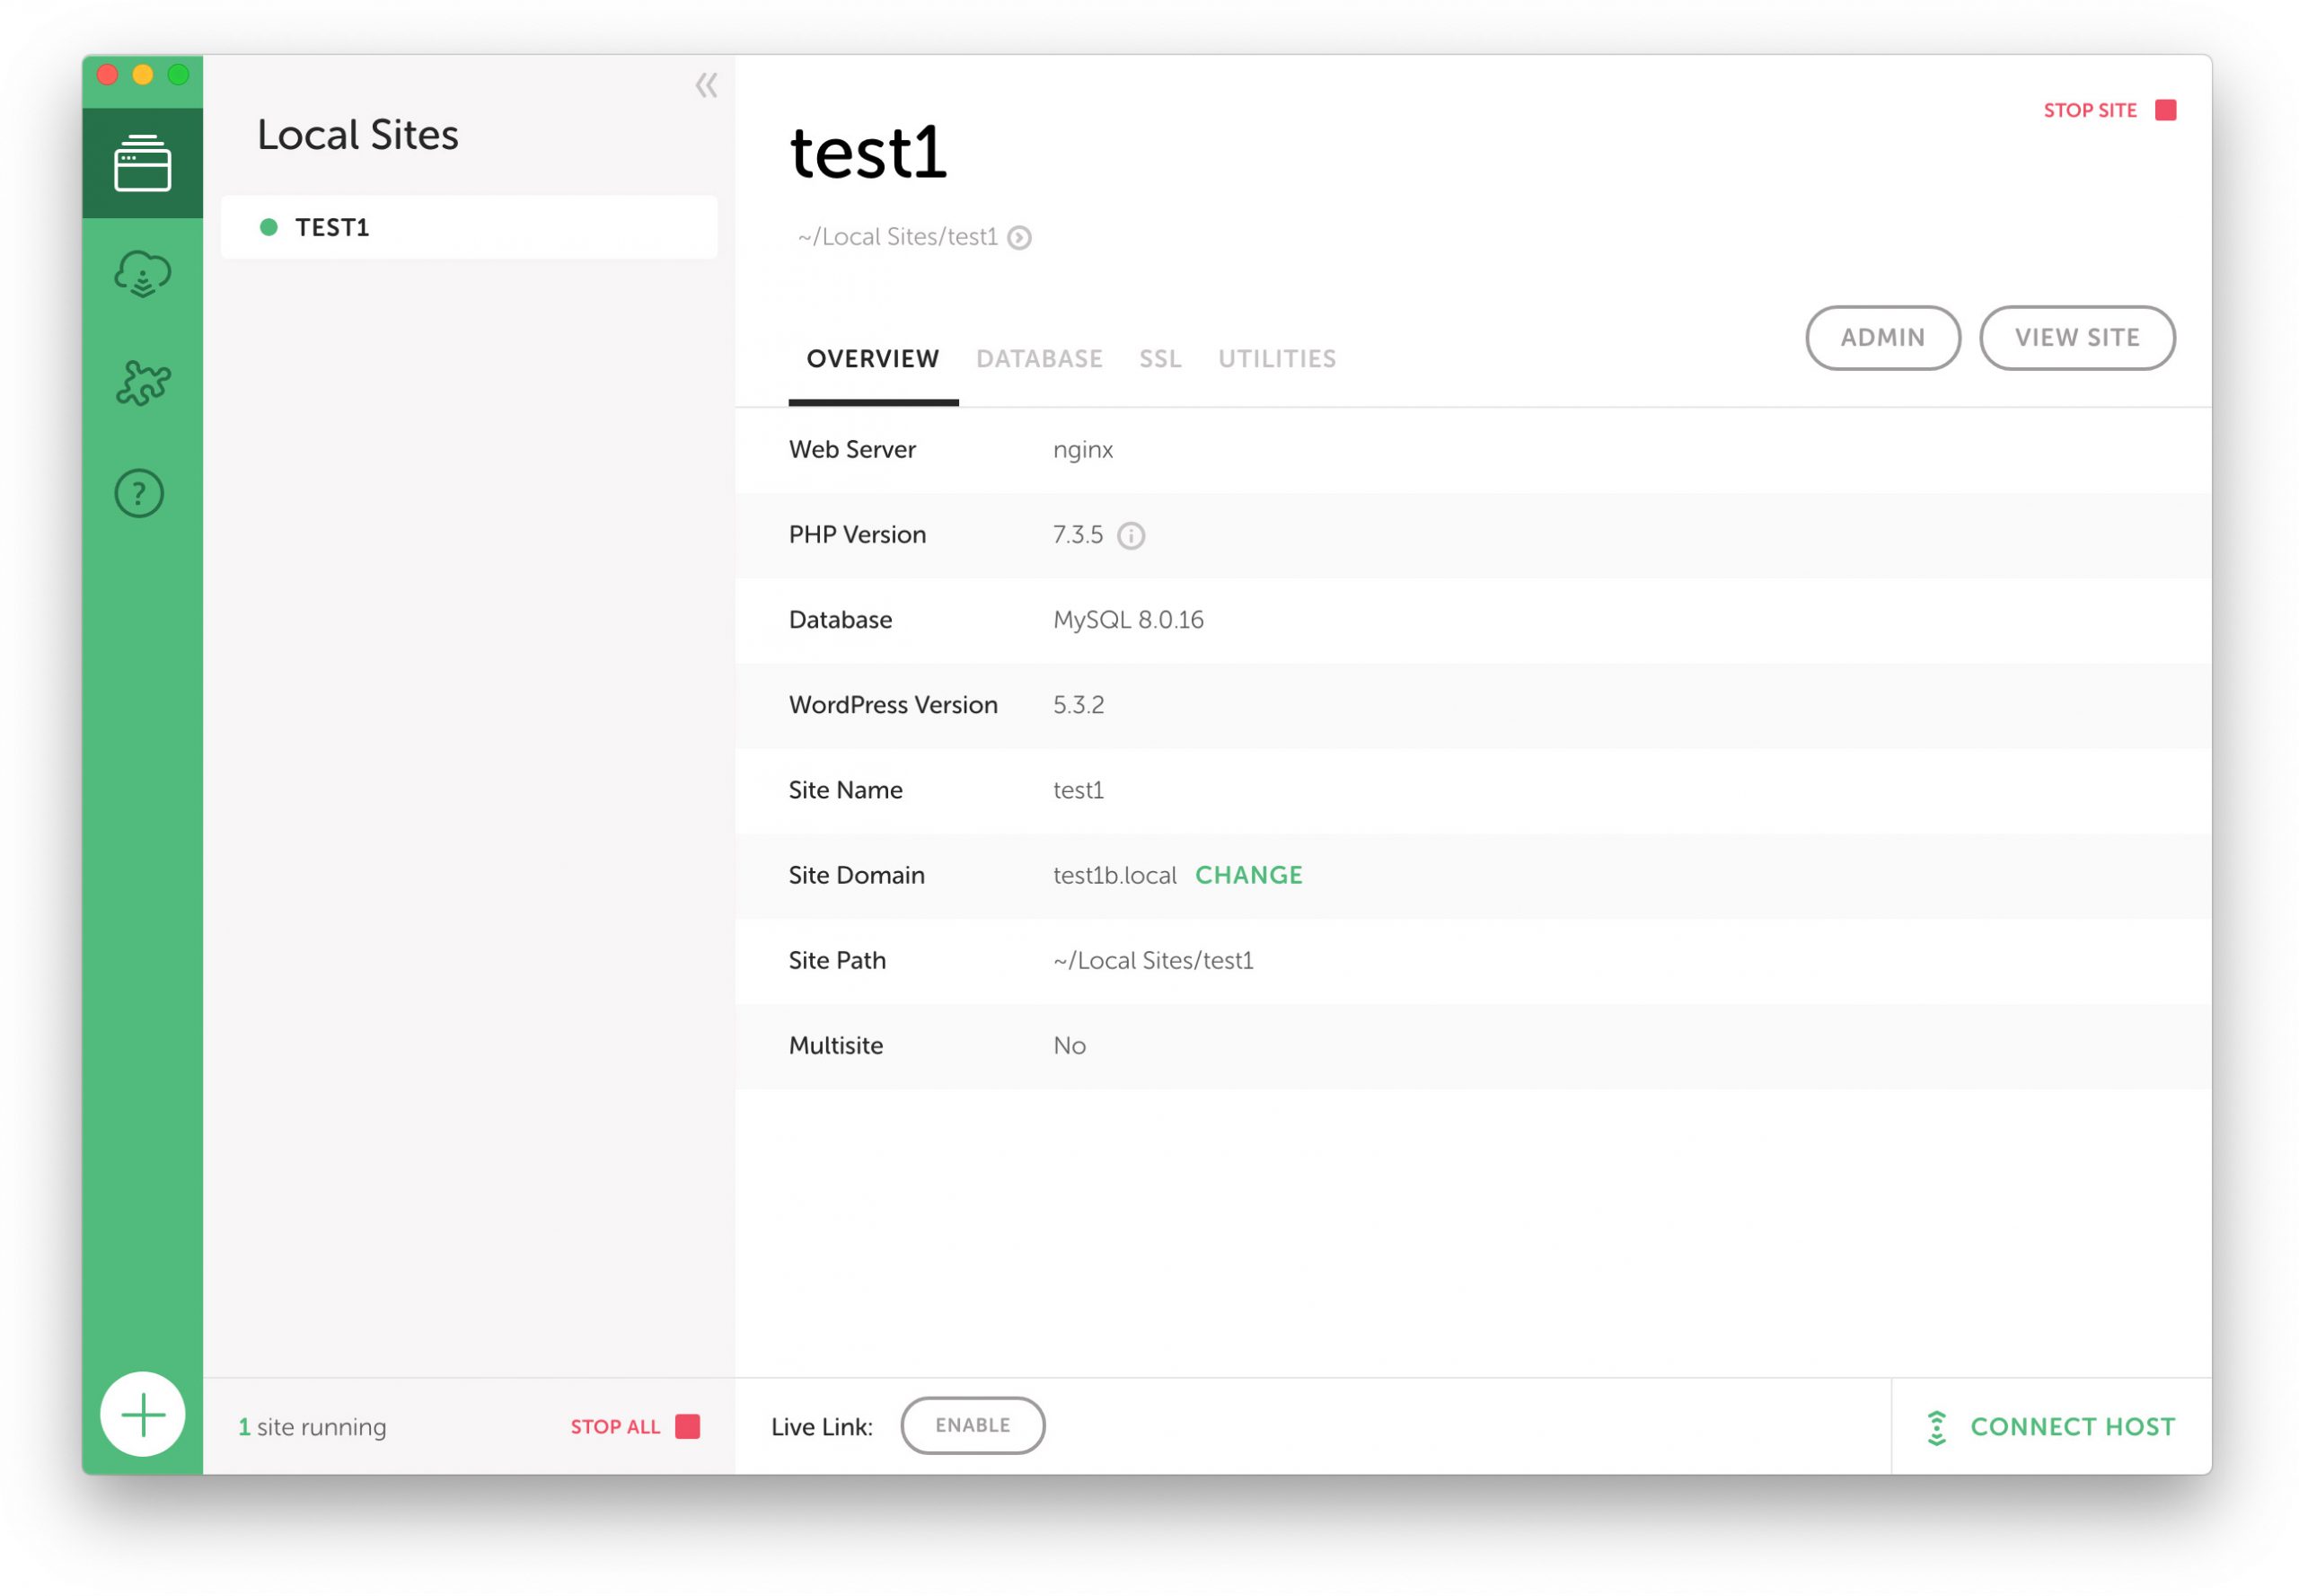
Local “Lightning” first impressions

Local “Lightning” is the latest iteration of Flywheel’s popular local development environment. Local is a suite of web server components that allows you to run PHP applications on your computer – a vast improvement on the bad-old-days when we had to FTP files to a remote server to test our work. Shudder.

Flywheel is a WordPress hosting provider so Local is aimed at WordPress developers, but can theoretically be used for any PHP application regardless of where it will be hosted.

Local site
Continue reading

0

Fixing CORS font errors on a Runcloud server

If you’ve ever needed to serve fonts from a web server to a remote application, then you’ve probably run into Cross-Origin Resource Sharing (CORS) errors. When you view a web page that is attempting load fonts from your server, your browser console displays an error message similar to this:

Access to https://my-server.com/font.woff from origin https://remote-server has been blocked by CORS policy: No ‘Access-Control-Allow-Origin’ header is present on the required resource.

The problem can be fixed by adding an Access-Control-Allow-Origin header to the font file, which allows access from the remote application.
Continue reading

2

Loading missing images from a remote server

When developing on a local server it can be painful to keep images in your media library synced with your production site. Sure, you could download the missing images and attachments to your local machine every time you need to work on the site, but this approach has two problems:

  1. It is time consuming
  2. The files take up space on your local drive

I recently discovered a way to seamlessly handle missing images so that they never 404 or occupy space on your local machine. The solution is an htaccess rewrite rule that checks if an image exists locally, and if it doesn’t, attempts to load it from your production server.

Here is a sample htaccess directive for WordPress:

# Load media files from production server if they don't exist locally
<IfModule mod_rewrite.c>
  RewriteEngine on
  RewriteBase /
  RewriteCond %{REQUEST_FILENAME} !-f
  RewriteCond %{HTTP_HOST} ^localsite\.dev$
  RewriteRule ^wp-content/uploads/(.*)$ http://remotesite.com/wp-content/uploads/$1 [NC,L]
</IfModule>

Remember to change “remotesite.com” and “localsite.dev” in the example to match your own domain, and adjust your file paths as necessary. If you’re implementing this on a WordPress site make sure to place it before WordPress’ own htaccess directive.

Hat tip to @stevegrunwell for bringing this technique to my attention.

13

Clean up pasted text in WordPress

I have a love/hate relationship with the paste plugin in TinyMCE, the JavaScript WYSIWYG editor that ships with WordPress. In recent releases TinyMCE has gotten very good at sanitizing text pasted from MS Word, but it is still much more permissive than I would like.

A long standing gripe is that classes are added to every paragraph and span when I paste text into the editor:

<p class="p1">This is <span class="s1">pasted</span> text</p>

This odd behaviour is consistent across many applications – InDesign, TextEdit, Mail – so I suspect it may be occurring at an OS level. In any case, I don’t want class attributes finding their way into markup unless I put them there!

A more significant problem is that TinyMCE doesn’t filter out HTML tags from pasted content. If you copy and paste text from a website you might unknowingly bring its markup along for the ride, and end up with something like this:

<div class="row">
  <div class="col-8">
    <table>
      <tr>
        <td><p>This is pasted text</p></td>
      </tr>
    </table>
  </div>
</div>

I’m sure you can imagine how disastrous that extra markup could be on your website’s front end.

Unfortunately TinyMCE doesn’t have a configuration option to specify which tags are permitted in pasted markup. The valid_elements option allows us to define which elements will remain in the edited text when TinyMCE saves, but that is an overzealous solution. On occasion you might need to add markup via TinyMCE, and valid_elements would strip it out again when you save your post. What is needed is a way to clean up text when it is pasted into TinyMCE, but still allow the user to type markup into the editor if they choose.

The solution comes in the form of the paste_preprocess option, which allows us to specify a callback that will be executed when content is inserted into the editor. Within that callback we can strip out any tags that we don’t want, and remove class, id and any other undesirable attributes from our content.

In WordPress you can hook into TinyMCE’s configuration using the tiny_mce_before_init filter. In your theme’s functions.php file:

add_filter('tiny_mce_before_init','configure_tinymce');

/**
 * Customize TinyMCE's configuration
 *
 * @param   array
 * @return  array
 */
function configure_tinymce($in) {
  $in['paste_preprocess'] = "function(plugin, args){
    // Strip all HTML tags except those we have whitelisted
    var whitelist = 'p,span,b,strong,i,em,h3,h4,h5,h6,ul,li,ol';
    var stripped = jQuery('<div>' + args.content + '</div>');
    var els = stripped.find('*').not(whitelist);
    for (var i = els.length - 1; i >= 0; i--) {
      var e = els[i];
      jQuery(e).replaceWith(e.innerHTML);
    }
    // Strip all class and id attributes
    stripped.find('*').removeAttr('id').removeAttr('class');
    // Return the clean HTML
    args.content = stripped.html();
  }";
  return $in;
}

We use jQuery to populate the DOM with the pasted content, then traverse the DOM and remove tags and classes we don’t want. Finally we extract the cleaned HTML markup and pass it back to the editor. This approach may seem convoluted, but it is far less error prone than using regular expressions to sanitize our content.

All you need to do is modify the whitelist variable, which contains a list of tags to allow past your filter.

One last thing: You might notice that our entire JavaScript function is contained in a string. This might seem odd, but is necessary since WordPress stores TinyMCE’s configuration options as an array of strings.

9

Particleground: a jQuery plugin for background particle systems

Lately I’ve noticed a few sites using JavaScript particle systems as animated backgrounds. I was curious about the technique so I created Particleground, a jQuery plugin that creates a similar effect.

particleground

The particle system can be fine tuned using several configuration options, including a parallax effect which is controlled by the mouse on desktop computers or the gyroscope on smart devices. Particleground works in any browser that supports HTML5 canvas.

See a demo

Download

View on Github

0

The Web Designer’s Bookshelf

I have just launched a new personal project called The Web Designer’s Bookshelf, which is a curated archive of articles about web and interface design.

wdb-header

Here’s the blurb:

As an industry we are obsessed with technical implementation. We write endlessly about front-end processes or the latest CSS and JavaScript techniques, but by focussing so much of our attention on technical concerns we have squeezed design issues out of the conversation.

The Web Designer’s Bookshelf is my attempt to rectify this imbalance. The site is an archive of articles that examine the history and craft of web and interface design, and related design disciplines, in a critical and thought provoking fashion.

Unlike technical articles, which date quickly, writing about design principles tends to have a longer shelf life. My hope is that the articles collected here will be of lasting interest to designers of all persuasions, and contribute to an ongoing conversation about the interactive design discipline.

Visit The Web Designer’s Bookshelf website, subscribe to the newsletter or follow @webdesbookshelf on Twitter.

1

A super minimal functions.php file

In my last post I talked about strategies to organize your WordPress theme’s functions.php file by following object-oriented programming principles. If you prefer to stick with a procedural coding style, here is a simple way to keep your functions.php file lean and mean.

Simply save each hooked function in a separate file, then use PHP includes to import them into functions.php:

require_once('includes/custom_excerpt_length.php');
require_once('includes/another_function.php');
require_once('includes/a_third_function.php');
// etc.

It doesn’t get much more minimal than that!

In this example our custom_excerpt_length.php file might look like this:

function custom_excerpt_length () {
  return 10;
}
add_filter('excerpt_length', 'custom_excerpt_length');
4

Organize your WordPress functions.php file

WordPress tutorials will often advise you to copy and paste code snippets directly into your theme’s functions.php file. That might seem harmless enough, but if you keep adding functionality in an arbitrary fashion your code can quickly become unmanageable. In this post I will share some strategies for keeping your functions.php file tidy and making it easier to maintain.

Keep the global space clean

One problem with the typical functions.php file – and, it could be argued, with WordPress generally – is that variables and functions are declared in the global scope. That means you risk naming conflicts with functions and variables declared elsewhere in your own code, in plugins, or in the WordPress core.

As an example, suppose you create a function named get_post_slug in functions.php. Now let’s imagine that in the future a function with the same name is introduced to the WordPress core. Your function declaration will now throw a fatal error:

Fatal error: Cannot redeclare get_post_slug()

To avoid naming collisions you could prefix your function names to make them unique – for example yourthemename_get_post_slug – but a more robust approach is to encapsulate your theme’s logic in a class.

A typical hooked function looks like this:

function custom_excerpt_length () {
  return 100;
}

add_filter('excerpt_length', 'custom_excerpt_length');

Here is that same functionality encapsulated in a class:

class YourThemeName {
  function __construct() {
    add_filter('excerpt_length', array($this, 'custom_excerpt_length'));
  }

  function custom_excerpt_length () {
    return 100;
  }
}

$yourthemename = new YourThemeName();

Because the custom_excerpt_length function is a class method it no longer has global scope, and the $yourthemename variable ensures that our theme’s logic has a single point of access. (Note: You should change YourThemeName and $yourthemename to something unique to your theme.)

You might have noticed that the second parameter passed to add_filter is an array, with $this as the first value. This tells WordPress to use a class method as a callback. You can read more about the different types of callbacks in the add_filter documentation.

Theme setup

Most themes have some setup code that needs to run straight away. Let’s add an init method to our class to handle this job:

class YourThemeName {
  function __construct() {
    add_action('after_setup_theme', array($this, 'init'));
    // Register action/filter callbacks here...
  }

  function init() {
    // All theme initialization code goes here...
    register_nav_menus(
      array(
        'header-menu' => __('Header Menu', 'yourthemename')
      )
    );
  }

  // Action/filter callbacks go here...
}

$yourthemename = new YourThemeName();

Any functionality you want hooked to the after_setup_theme action can go in the init method. In the example above we registered a navigation menu.

Utility methods

In addition to WordPress action/filter hooks your theme class can also provide utility methods, which can be accessed from templates.

Here is a simple utility method to get the ID of a category by supplying its name:

function get_category_id ($cat_name) {
  $term = get_term_by('name', $cat_name, 'category');
  return $term->term_id;
}

If you include that method in your theme’s class you can now access it from a template like so:

$yourthemename->get_category_id('category-name');

Group your functions by type

Rather than arranging callback function in a haphazard fashion, grouping them by type makes them easier to find.

As we saw earlier all of your theme’s filter/action callbacks are registered in the class constructor, and all setup logic is placed within the init method. I also like to group all my action callback functions together, my filter callback functions together and my utility methods together.

class YourThemeName {
  function __construct() {
    add_action('after_setup_theme', array($this, 'init'));
    // Register action/filter callbacks here...
  }

  function init() {
    // Theme setup code goes here...
  }

  // Action callbacks go here...

  // Filter callbacks go here...

  // Utility methods go here...
}

Comment your code

It might go without saying, but well written comments make your code easier to read and comprehend. Well structured comments can go a long way toward organizing your functions.php file.

/**
 * Get the category id from a category name
 *
 * @param string $cat_name The category name
 * @return int The category ID
 */
function get_category_id ($cat_name) {
  $term = get_term_by('name', $cat_name, 'category');
  return $term->term_id;
}

Use a plugin for site-specific functionality

While it may be tempting to dump all your site’s custom functions into your functions.php file, it is good practice to encapsulate site-specific logic in a separate functionality plugin. In addition to long term maintenance benefits, this separation of concerns streamlines your functions.php file by offloading some of its functionality to a plugin.

There have been many good articles written about what belongs in a functions.php file and what belongs in a functionality plugin, but I think Curtis McHale sums it up nicely:

The only deciding factor in where you put your code is the life of the functionality. Will you still need to have that portfolio custom post type the next time you redesign your site? If the answer is yes then you should be building a plugin with the code. If the answer is no, then put the code in you theme functions.php.

Example functions.php file

If you employ the strategies I have outlined in this post I hope you will find that your functions.php file is better organized and easier to manage. Here is an example of how the final file might look:

/**
 * YourThemeName
 */
class YourThemeName {
  /**
   * Constructor
   */
  function __construct() {
    // Register action/filter callbacks
    add_action('after_setup_theme', array($this, 'init'));
    add_filter('excerpt_length', array($this, 'custom_excerpt_length'));
  }

  /**
   * Theme setup
   */
  function init() {
    // Register navigation menus
    register_nav_menus(
      array(
        'header-menu' => __('Header Menu', 'yourthemename')
      )
    );
  }

  /**
   * Filter callbacks
   * ----------------
   */

  /**
   * Customize post excerpt length
   *
   * @return int The new excerpt length in words
   */
  function custom_excerpt_length () {
    return 100;
  }

  /**
   * Utility methods
   * ---------------
   */

  /**
   * Get the category id from a category name
   *
   * @param string $cat_name The category name
   * @return int The category ID
   */
  function get_category_id ($cat_name) {
    $term = get_term_by('name', $cat_name, 'category');
    return $term->term_id;
  }
}

// Instantiate theme
$yourthemename = new YourThemeName();
48

Center and crop thumbnails with CSS

Here is a handy CSS centering technique I first noticed in the WordPress media library, where it is used to centre and crop irregularly sized thumbnails within a square container.

cropped-thumbnails

The technique uses CSS3 transforms, so it works in all modern browsers, including IE9 and above.

<div class="thumbnail">
  <img src="landscape-img.jpg" alt="Image" />
</div>
<div class="thumbnail">
  <img src="portrait-img.jpg" class="portrait" alt="Image" />
</div>
.thumbnail {
  position: relative;
  width: 200px;
  height: 200px;
  overflow: hidden;
}
.thumbnail img {
  position: absolute;
  left: 50%;
  top: 50%;
  height: 100%;
  width: auto;
  -webkit-transform: translate(-50%,-50%);
      -ms-transform: translate(-50%,-50%);
          transform: translate(-50%,-50%);
}
.thumbnail img.portrait {
  width: 100%;
  height: auto;
}

The technique works by positioning the image so that its top left corner is in the centre of its container. Then, a 2D translation moves it up and left by half its own width.

The key here is that the percentage values passed to the translate function are relative to the element, not its container, as would be the case if we were to manipulate the element’s top and left properties instead.

View a demo

Note that the portrait format image has the class portrait, so that we can correctly scale it to fill its container.

So there you go. A really simple CSS technique for centering and cropping thumbnails.